Backwash Valve – Maintenance
Multiport or Push-Pull
Valves
Annual Maintenance
 Some regular maintenance on the backwash Some regular maintenance on the backwash
valve can help to eliminate a lot of the problems with these valves. Many “pool emergencies” are caused by a lack of routine maintenance.
Push-Pull Valves
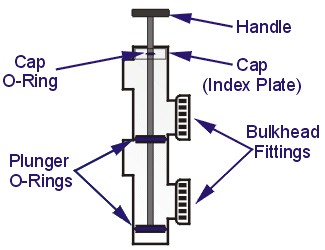
The push-pull valve is the easiest to maintain because of its simplicity.
The plunger o-rings are most likely to wear since they are a moving part.
The cap o-ring will wear especially if the shaft is worn. The handle does not typically break off except on Swimquip Unitrol valves.
BE CAREFUL WHEN REMOVING THE CAP ON PAC FAB VALVES. REMOVE THE SCREWS
COMPLETELY SO YOU DO NOT SCORE THE CAP BECAUSE THAT WILL CAUSE A LEAK WHEN YOU PUT IT BACK TOGETHER.
Basic Lubrication
-
Remove the plunger assembly. Normally this can be done by removing the set screws at the top of the valve or
unscrewing the cap at the top of the valve.
-
Inspect the o-rings for wear. Be prepared with new o-rings if needed. (it is not a bad idea to replace the
o-rings on a regular basis anyhow since they are so cheap.)
-
Lubricate the o-rings, the valve body and the shaft of the valve. Basically, you want lubrication anyplace that you
have a moving part against an o-ring.
-
Put the valve back together and test the operation.
Replacing Cap O-Ring
-
Remove the plunger assembly. Normally this can be done by removing the set screws at the top of the valve or
unscrewing the cap at the top of the valve.
-
Remove the handle. Inspect the shaft for wear. A very worn shaft will need to be replaced otherwise it will tear
up the new o-ring quickly.
-
Clean up any burrs on the end of the shaft so that the shaft is smooth when you pull it through the cap.
-
Remove the shaft from the cap and pick the old o-ring out. A dental pick works well for this.
-
Install a new o-ring and reassemble the valve and test out.
Multiport Valves
The multiport valve is a little more difficult to take apart and service.
Basic Lubrication
-
 Remove the top half of the valve. Remove the top half of the valve.
-
Inspect the spider gasket for wear. If it is worn, let the customer know about it. We normally do not replace
the gasket until it fails because of the limited success rate in replacing multiport gaskets (see below).
-
Inspect the body of the valve. If it is warped or if the channels are cracked, then the valve will need to be
replaced.
-
Lubricate the gasket the valve body and the shaft of the valve. Basically, you want lubrication anyplace that you have
a moving part against an o-ring.
-
Put the valve back together and test the operation. As you push the handle down, the force of the spring should pull
it back up easily. If not, there is probably debris on the shaft and o-ring that needs to be cleaned out. See the instructions for complete disassembly in
the section below.
Note: If the gasket is bad, it is often better to replace the valve with a plunger valve because the plunger valve is much
easier and less expensive to service in the long run. Replacing the gasket requires two trips and the part for a total cost of about $150.00, and there is NO
guarantee that the gasket will stay in place, especially on high flow valves. Replacing the entire valve with a plunger valve requires one trip and a valve for a
total cost of about $200.00. Given the options, most customers choose to replace the valve.
 When When
taking apart a multiport valve, make sure you note the position of the top before your remove it. Otherwise, you may put it on wrong and end up with some serious
problems.
The spider gasket is one with several spokes in it and looks like the diagram below (top view shown).
It is normally glued into the valve body although some valves have them glued into the diverter.
Complete Disassembly
-
Remove the top half of the valve.
-
Remove the pin holding the handle in place.
-
Pop everything apart and clean all the dirt and debris around the shaft.
-
Replace the spring (if needed) and o-ring and reassemble the top half.
-
Lubricate the valve and reassemble and test the operation.
Be aware that the hardest part of this job is getting the valve back together. The spring makes it tough to get the handle
back on, but with practice it can be done.

|


 Some regular maintenance on the backwash
 Remove the top half of the valve.
  When
When